Friday, October 17, 2008

Ubuntu - Auto mounting HDD at boot

After fidlling lot with Ubuntu finally here the sequence to auto mount HDD partitions and make them behave properly.

1. Open /etc/fstab. Add these lines.
 
/dev/sda2 /media/Vista ntfs-3g defaults,user,exec,uid=1000,gid=100,umask=000 0 0
 /dev/sda3 /media/SOFTWARE vfat defaults,user,exec,uid=1000,gid=100,umask=000 0 0


2. Make the corresponding directories in /media ( remember to mount the HDD partitions in the /media not the traditional /mnt else Ubuntu wont show it as HDD ).

3. Test the fstab success
 sudo mount -a


4. To find all the drives entries use fdisk or blkid
 sudo blkid


That's it, next reboot all partitions will be auto mounted.

Saturday, October 11, 2008

iMac defeated

Finally tweaked ubuntu to defeat the display superiority of Mac. It aint so easy since Ubuntu is as ugly as anything can be. Unfortunately connonical didnt realize that users "look" at the monitor, so looks should be pleasant. But no big deal, not everything should be done by them lets fix it.

Simply install avant-window-manager and conky to get the look.

Installation guides.
http://www.quicktweaks.com/2008/04/11/three-little-things-to-make-your-ubuntu-desktop-beautiful-and-productive/
http://www.quicktweaks.com/2008/09/27/gmail-weather-beauty-right-on-your-ubuntu-desktop/

For Mac-user's envy here's the screenshot.

Mplayer

Well sometime linux can be frustrating and when it comes to mplayer nothing can me more worse. After lots of head banging i found a simple and elegant way to do it. Simply type in the following commands and mplayer will be up n running.

1. Add mplayer repositories. For that open /etc/apt/sources.list and augment these two line.
 deb http://archive.ubuntu.com/ubuntu dapper multiverse
 deb-src http://archive.ubuntu.com/ubuntu dapper multiverse


2. Run these two commands.
 sudo apt-get update
 sudo apt-get install mplayer


3. Run Mplayer, If all goes fine you can have a gala time. But for it was not so. Mplayer took lots of loading time while disabling screensaver. I read that a conflict b/w comfiz and mplayer. So simply goto mplayer>right click>preference>misc and uncheck "Disable screensaver" stuff.

4. In case mplayer not finding video out device. open ~/.mplayer/config and search for line "vo".
Simply add the output device name like xv. Finally your mplayer conf should have something like "vo=xv". To list all supported device type `mplayer -vo help` that will list you out all the option..
 mplayer -vo help


5. Worst, mplayer's got dumb. Simply mplayer>Right click>preference>Audio Tab select "pulseAudio".

Hope this helps

Tuesday, July 29, 2008

Working with DVD/CD Images in Linux

PowerIso is a cool utility to decompress/Change format of .daa .iso images. I tried it on 2.4GB file and it worked cool for me

PowerISO Download site (http://www.poweriso.com/download.htm)

Installation Command
 tar -xvf poweriso.tar.gz
 sudo cp poweriso /usr/bin
 sudo chmod 755 /usr/bin/poweriso

Simple convertion command (.daa to .iso)
  poweriso convert input.daa -o out.iso -ot iso

Mounting ISO Images to folder
 sudo mkdir /mnt/test
 sudo mount -o loop -t iso9660 out.iso /mnt/test

Friday, July 18, 2008

Creating USB Minix Key

Finally i succeded in creating USB Key containg Minix3.
Steps are simple

  1. Download the USB Key image from Minix Download Section
  2. Next determine the USB device.
     lshw -class storage
     df -k

  3. Use fdisk to format USB Key in Linux Primary format.
     sudo fdisk /dev/sdb

  4. Use "dd" to make a raw copy of the Image downloaded.
     sudo dd if=usb_image-3.1.2a of=/dev/sdb bs=1024

  5. Next Reboot your computer and select "USB Device" to boot from.


Last step is kinda luck, depends if your BIOS allows booting from USB Device. If Not all other step goes in vain :).

Thursday, July 17, 2008

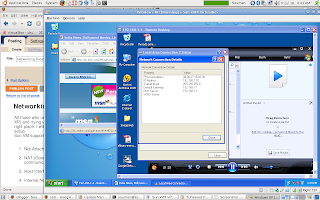
Networking (Host Interface) in xVM

All those who use Sun Virtual Machine (xVM) to run guest OS over Ubuntu (esp XP) and trying very hard to achieve proper network setup, then you are at the right place. I will show you how to give your guest OS proper native network setup.
Sun VM supports 4 kinda Network Adapter

  1. Not Attached (behaves as network cable is un-pulgged).

  2. NAT (Good if you want to sruf web and download coontents, not much communication with host OS).

  3. Host Interface (Provides almost real network adapter kinda support).

  4. Internal Network (Some kinda secure and fast stuff as per document).


We will use Host Interface to achieve our network structure.

Software requirement:

  • Bridge Utility
    apt-get install bridge-util

  • Uml Utility
    apt-get install uml-utilities 


Next provide the access right to the tap0 device

sudo chmod 0660 /dev/net/tun
sudo chgrp vboxusers /dev/net/tun


Next create the tap0 device
sudo tunctl -t tap0 -u  


Now create scripts files to control Starting/Stopping the tap0 interface

StartTap0.sh
 
#!/bin/sh
gksu brctl addbr br0
gksu ifconfig eth0 0.0.0.0
gksu brctl addif br0 eth0
gksu ifconfig $2 0.0.0.0
gksu brctl addif br0 $2
gksu dhclient br0


StopTap0.sh
 
#!/bin/sh
gksu brctl delif br0 $2
gksu ifconfig eth0 down
gksu ifconfig $2 down
gksu ifconfig br0 down
gksu brctl delif br0 eth0
gksu brctl delif br0 $2
gksu brctl delbr br0
gksu ifconfig eth0 up


After the scripts are ready open xVM and navigate to network adapter tab, Set the following config.


  • Attached to : Host Interface

  • Interface Name : tap0

  • Setup Application : ~/StartTap0.sh

  • Termination Application : ~/StopTap0.sh


All set just boot up the guest OS, fill in the password and enjoy full fledge network. At Guest OS Network adapter will only take static IP, remember to set it to something under the same subnet mask. Thus enjoy complete Network (lets play). :D

Sunday, July 6, 2008

Banshee (Removing library entries)

In case you use Banshee (Music player) and trying to remove 1000 or more songs, then you are in serious trouble. Banshee got some issues with banshee.db query string, ie while performing this operation it overflows raising exception. Still Banshee being a reliable player quiting it is not an option. So here's a way to remove the complete lib in jiffy.


cd ~
cd ./.config/banshee
ls
banshee.db covers plugins
mv banshee.db banshee.db.old


That's it, you have moved Banshee library nowhere but to something that banshee will never use.

Caution:
You need to import all your songs again on Banshee, still its better than deleting individual files.